
Are you ready for the next step in the Quilt Binding Tutorial series?
In case you missed them, here is a quick link to Part 1 and Part 2 😊
Now, just like in Part 2, this one involves some hand sewing, but I don’t want that to scare you off because this technique is SUPER fun and adds the BEST texture and details to your quilts.
And, I’ll let you in on a little secret, this hand quilting technique is quicker than the blind stitch we used in the last tutorial.
“Shannon, did you just say faster?”
Yup, I did!
So, if you’re looking to add a cute detail to your binding without it taking forever, then read on!

This post contains affiliate links, meaning, at no additional cost to you, if you click through and make a purchase, I may receive a commission.
TOOLS
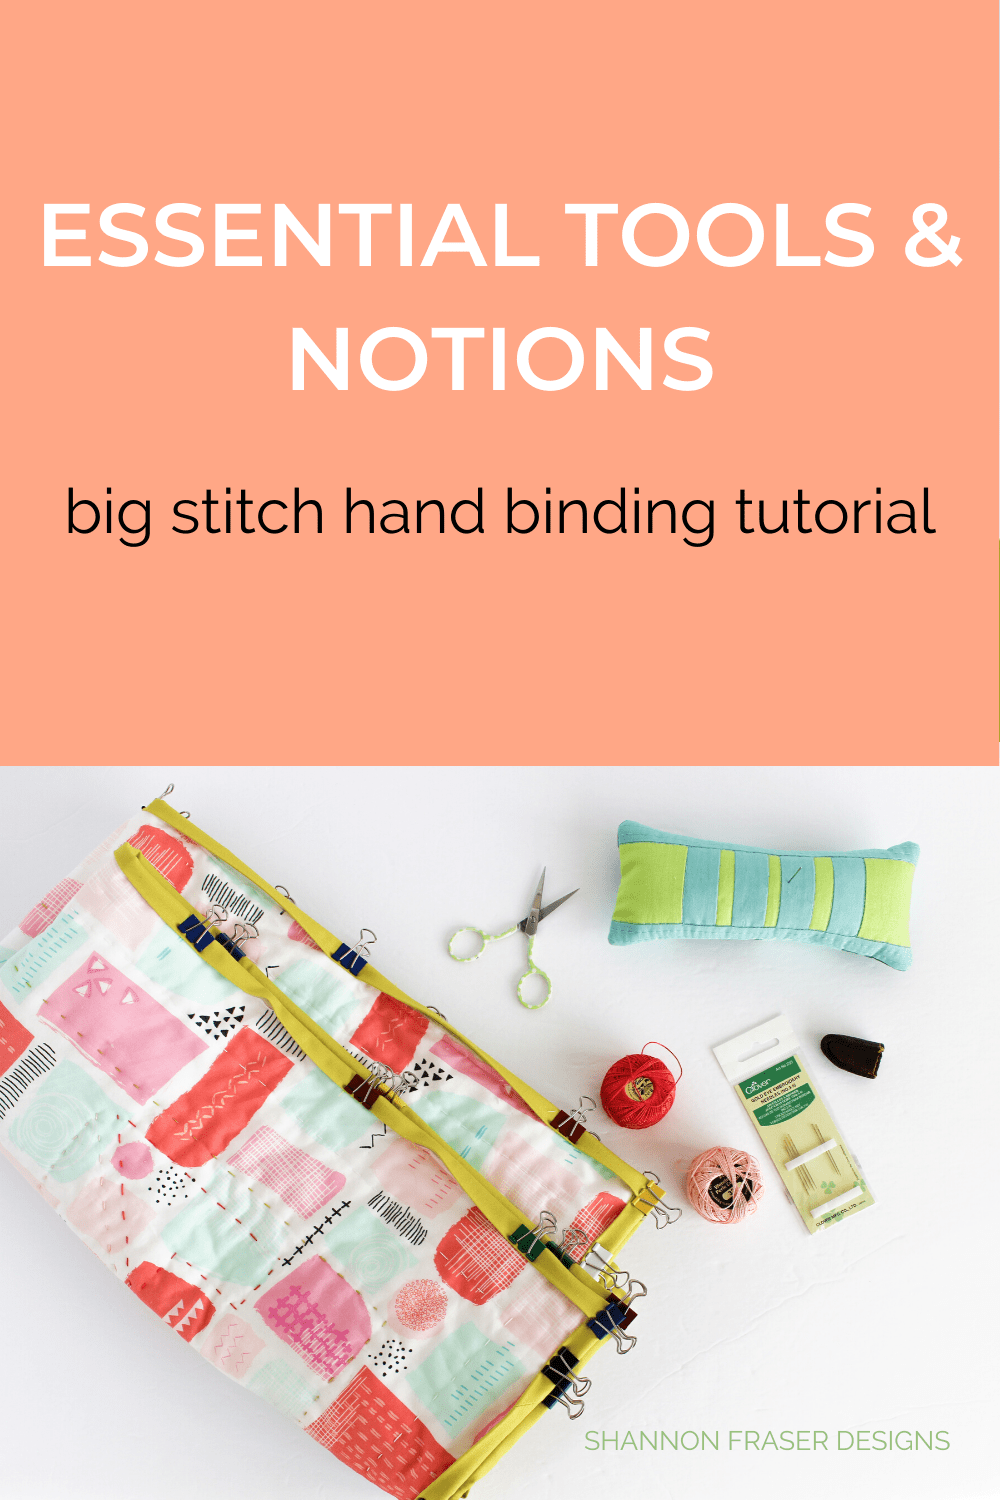
Before we get started, here’s a list of all the tools and notions you’ll need to big stitch hand quilt your binding:
- Pearl cotton thread (also referred to as perle cotton thread) in size 8 – here’s a list of places to source these pretties.
- These needles (since they have a larger eye to accommodate the thicker thread)
- Needle threader (optional, but some quilters swear by them – I used mine a couple of times before it broke on me, so I tend to skip it)
- Scissors
- Thread conditioner (optional – I don’t always use it and haven’t had any problems)
- Pin cushion or needle minder (here’s a DIY on how to make your own or grab the handy Sit ‘n Sew Pincushion pattern in the shop)
- Thimble
Click here for a list of all my essential quilting tools.

PREPARATION
I won’t bore you with all the details on how to prepare your binding, as it is the same as in Part 2. So, if you want those perfect mitered corners, check that out!

THREAD CHOICE
Unlike with the blind stitch binding, where you want the thread to match as closely as possible to your binding fabric, with big stitch hand quilting, you want your stitches to show! So, this is a prime opportunity for you to add another pop of colour!
After all, if you’re going to take the time to add these details, you want them to shine, right?!

On this baby Irish Vortex quilt, I opted for a light pink thread for a more subtle pop. I really wanted the colours in the backing fabric to be the focus, but I still wanted the added texture to coordinate with all the hand quilting featured in this quilt.

But the sky is the limit as to what you can do. Here’s a bolder take on this technique featured in the Indian Star Mini Wall Hanging I made several months ago.

BIG STITCH HAND QUILTING – PREPARATION
This is such a simple straight forward technique involving a running stitch.
It couldn’t be easier! Let me show you how.
First off, start by knotting your thread – twice. You want a good solid knot, otherwise it will pop through your fabric and that’s just annoying. So, double it up!

You can opt to condition your thread, but I haven’t really found it necessary to do so with pearl cotton thread. It certainly won’t harm anything. I recommend trying it both ways and see which feels right to you.
Ok, now that your thread is primed, you can now thread your needle 😉

BIG STITCH HAND QUILTING – OPTION 1
There are in fact a few ways that you can start your quilting, I’m going to show you two ways. Here’s the first!
To start, you want to insert your needle about an inch away from where you want your stitches to start, making sure to pass through the backing and batting without going through the front of your quilt and then pop your needle out where you want to start.
I tend to stitch about a 1/8 of an inch away from the edge. I don’t want too much fabric to be flapping on the edge, but this is really about personal preference. So, again, do what feels right to you.

Once you’ve got your needle where you want to start stitching, pull tightly (but not too tightly) on the thread to pop your knot between your quilt top and batting. This will help secure your knot in your batting and prevent it from popping out once you start stitching.

Now, just start taking small stitches – placing your needle about a ¼ inch from where your needle popped out and then dive back through the binding, the quilt backing and the batting, but not going through to the front of the quilt.
Rock the needle back so that you pop your needle through the batting, backing and binding and then pulling the thread taunt, but not too tight. If you pull too tightly everything will pucker, but if you keep it too loose, your binding won’t stay put and will be loosey goosey. You don’t want that. You want a nice secure binding.

You can take more than one stitch at a time before pulling your thread through. This takes some getting used to, and when I first started, I found it easier to just start with one stitch at a time. If you’re getting the hang of it, start loading up a few stitches at a time – dive your needle through your binding, backing and batting, then rock your needle back coming through the batting, backing and binding, then rock back into the binding, backing and batting – continue rocking and diving until you have a few stitches loaded on your needle, the pull your thread through.
Continue until you have stitched the entire perimeter.
To finish off your stitches (either when you’ve run out of thread or come to the end of your quilt perimeter), knot your thread by creating a loop of thread around your finger, pass the needle all the way through the loop you created. Then use the tip of the needle to guide that loop down close to where you took your last stitch and pull to close the loop forming a knot. Repeat 1 more time. Put your needle directly in the same hole you took your last stitch and travel between the backing and front and exit about an inch away, pulling to pop your knot from the front of your binding and burying it between the layers of batting. Cut your thread for a fully buried knot.


A quick tip, similar to how you wanted some breathing space to attach your quilt binding ends (here’s a refresher on that in Part 1), here too you want to leave yourself enough wiggle room to be able to knot your thread and then be able to bury your knot. If your thread is too short, you’ll have a hard time positioning your needle. Trust me, I’ve done it way too many times than I care to admit!

BIG STITCH HAND QUILTING – OPTION 2
The main different between Option 1 above is where you start your knot and initial stitch from.
Instead of starting on the backing and travelling towards the under edge of your binding, in this method you start from right under the binding and travel through the backing and batting to pop up through the binding fabric.
This technique means you don’t need to pop your knot through the layers of fabric as it will be hidden by the binding.
Now that your needle is positioned near the edge of your binding start your running stitch, just as we did in Option 1.
That’s all there is to it!
DEALING WITH THOSE CORNERS
Whether going with Option 1 or Option 2, the process for tackling the corners is the same.
You’re still using your running stitch, but the key is to make sure you’re stitch (either the beginning or ending of a stitch) lands right at the tip of the corner so that you’re securing that mitered corner down.
There’s nothing fancy here, just keep it simple and get it tacked down and then carry on with your running stitch.
It’s as easy as that!

VIDEO | SEE IT IN ACTION

I’m such a visual learner that I didn’t want to leave you hanging without a video to help you see the big stitch hand binding technique in action!
You now have a couple of big stitch hand binding techniques under your belt. All that’s left is to give it a go and practice. Yes, practice will go a long way in helping you get into a rhythm and find your own stitch style. It’s similar to handwriting, we all bring our own unique touch to the technique 😉
For more quilt binding tutorials, refer to:
- Quilt Binding Tutorial Part 1 – How to make and attach your binding
- Quilt Binding Tutorial Part 2 – How to blind stitch your binding
- Quilt Binding Tutorial Part 3 – How to big stitch hand quilt your binding
- Quilt Binding Tutorial Part 4 – How to make bias binding (essential if you’re binding anything with curves)
- The Binding Notions I Reach for Every Time
And there you have it! You’re now fully equipped to create your binding from scratch and attach it either by hand using a blind stitch or the more visual and textural big stitch hand binding shown here.
What’s your favourite way to finish off your binding? Share in the comments below!
Happy quilting!
xo,
Shannon
Never miss a post – sign up for the weekly newsletter.
This post uses affiliate links. For more info, visit the FAQ page.

I just love your tips! and your quilting ideas and techniques! How do I get the correct size for a leather thimble? Should I use 2? 1 for thumb and 1 for middle finger? or 1 on each hand?
Great question about sizing! I believe I went with size medium and was concerned when I first got it that it was a little stiff and snug. The leather softens and molds to your finger over time and feels glorious. I have small hands, but kinda chunky fingers – ha! I use just the leather thimble on my middle finger, but I do sometimes use silicone ones on my thumb and index finger if my needle is stuck. A rubber band can work in a pinch too!
Thanks for your good ideas!
I love your tutorials and have been following along with you for the quilted Hovea coat, where I first discovered you. Your post are always beautifully presented and photographed. Sorry to hear about your sore hands and hope all is well now.
Thank you so much, Jan!! Thrilled you enjoy the tutorials and find them helpful ☺️ I’m always looking to share the Quilty fun!
Do you find the big stitch binding method holds up on the baby quilts? I usually blind stitch my binding down but recently saw this big stitch method and I love it!
I haven’t had any issues within using big stitch hand quilting on the binding for my baby quilts. So far they’ve held up beautifully, even with repeat washing. Plus, it’s fun to see those little stitches and run your hand over them for an extra tactile feel!
I see the DMC perle cotton ball what size do you recommend? I know the ball come in size #5,#8 and #12….
Oh, those are 8wt perle cotton balls, Joan!
Thank you🫂
When I finish off a line of thread, I like to bury the thread and knot under the binding itself. Then I don’t have to worry about popping another knot.
Love that, Kris! Thank you for sharing your tip!